

Text by Sohrab Saadat Ladjevardi
As you know I’m a sax player myself. And one technique I’ve never tried out was circular breathing. Why? Because from the start of my saxophone career my approach to music was to play my horn naturally based on my own breathing rhythm. Especially from Kendo I adopted a breathing technique which didn’t allow circular breathing. Kendo taught me to breathe “naturally”, i.e. breath in and breath out as my body wants to do it. So it was unnatural for me to play very long tones.
I found already out during my first year playing the horn that when you stop breathing and playing at the same time, you are able to hear “silence.” Silence is then an “unheard space.” Thus creating and manipulating space between tones and when to stop playing became major issues in my music.
Developing my own sound on the horn was my priority and still is. Sound dynamics became also an important part of my music. Through Kendo and Zen practice I learned that extreme performances in general and in music, such as sustaining very long notes, executing very fast and complicated chord progressions, wouldn’t make me a “real” musician. A real musician just plays himself and would use a technique as a tool to express an idea. Nowadays musicians depend mostly only on technique without having any idea what they are doing. Circular breathing could be one of these dangerous techniques to lose yourself.
But all this said there are exceptions of great musicians who made circular breathing to an art and made music with this technique, such as Ian Anderson (Scottish singer, songwriter and multi-instrumentalist best known for his work in Jethro Tull), Rahsaan Roland Kirk (jazz multi-instrumentalist), Evan Parker (free improvising saxophonist noted for his lengthy circular breathing excursions on soprano and tenor saxophones), John Surman (Jazz multi instrumentalist, mostly on saxes and clarinets, on “Cloud Line Blue” and other albums) and Anthony Braxton (American saxophonist and composer). I had known all these musicians before I started playing the saxophone. And it is used extensively in playing the Australian didgeridoo, the Sardinian launeddas and Egyptian arghul, as well as many traditional oboes and flutes of Asia and the Middle East.
(Speaking of circular breathing becoming a sport or competition: in 1997, a Guinness World Record was set for longest held musical note. Kenny G used circular breathing to sustain an E-flat on a saxophone for 45 minutes and 47 seconds.In February 2000, Vann Burchfield set a new Guinness world record for circular breathing, holding one continuous note for 47 minutes, 6 seconds, surpassing Kenny G’s record.)
And another BUT: while writing this intro I changed my mind and decided to start to learn the circular breathing from tomorrow and try to incorporate this breathing technique in my music. Maybe I can prove myself wrong and can use it to make silence “hearable.”
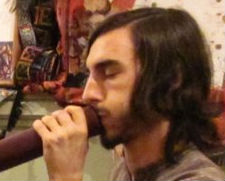
AJ Block, a music colleague of mine and a didgeridoo teacher is going to tell us how to learn it.
 Text by AJ Block
Circular breathing is a wind instrument technique that allows the player to sustain a tone for an extended period of time. This is accomplished by storing air in the mouth (inflating the cheeks) and using this reservoir of air to inhale through the nose while air is still coming out the mouth. People always ask me if it is difficult to circular breathe and I usually reply that it is just a slight variation on normal breathing. Circular breathing is key to didgeridoo playing because it allows for the continuous drone to remain unbroken, forming a strong foundation for the complete sound. Learning to circular breathe is like going to the gym in that you are working to develop muscle tone, flexibility and control. While it may seem challenging, practice of the following exercises you will give you an understanding of how the mechanics work and how to successfully master the art. Some people find it easier to learn circular breathing by playing the didgeridoo but you do not need an instrument to practice these exercises.
1. Breathe through your nose with inflated cheeks. Fill your cheeks with air so they are puffed out and hold your lips tight so no air escapes. Inhale and exhale naturally through the nose, keeping the cheeks filled with air the whole time. Inhale slowly. Exhale slowly. This first step serves to establish independence between your breath and the air in stored in your mouth reservoir.2. Spit water. Fill your mouth with water so that your cheeks are bulging out. Gently squeeze your cheeks and bring your jaw up as if biting so the water streams out. Maintaining a constant stream, inhale and exhale naturally through your nose. Your goal is to have an uninterrupted flow of water coming out of your mouth as you breathe. This exercise can be practiced each time you step into the shower.3. Inhale through the nose and exhale through the mouth with inflated cheeks. Start with your cheeks inflated and mouth closed. Inhale through the nose, keeping your lips sealed and your cheeks inflated. Then exhale through your mouth, keeping your cheeks just as full. On your next inhale, seal your lips again. Continue with this cycle maintaining inflated cheeks throughout.
4. Inhale through the nose while squeezing air out of your mouth
This is the first stage in what will become a full breath cycle. Start with your cheeks inflated. At the same moment you begin to inhale through the nose, squeeze the air out of your mouth by bringing your jaw up and tightening your cheek muscles. You should strive for a strong but quiet inhale through the nose. With some practice you should be able to synchronize the flow of air coming in your nose and the flow of air going out your mouth. Practice this until you get good at it.
5. Add the “HA”
Start with exercise 4. After you simultaneously inhale through the nose and squeeze air out your mouth, make a strong exhale from the lungs by saying “HA”. This out-breath should come from deep in your core so be sure that your diaphram is engaged and abdominal muscles are tightening to push the air out. This exhale should also push air back into your cheeks.
6. Find the rhythm
Once you have combined steps 4 and 5, repeat them over and over again until you start to feel the groove. Make the repetition as musical as you can. The goal is to get air constantly coming out of your mouth with no gap between the inhale and exhale. With practice you will be able to blend the air flow from the two sources (mouth and lungs) into one rhythmic cycle, the circular breath.
After you have mastered step 6 and completed the cycle, you’ve done it! It is time to pick up a didge and put your new circular breathing skills in action.